Jwt Basic Authentication Login Example Java Spring Boot

In the past month, I had a chance to implement JWT auth for a side project. I have previously worked with JWT in Scarlet on Runway, but this was my start fourth dimension in Spring.
In this post, I volition endeavour to explain what I have learned and practical in my project to share my experience and hopefully assist some people.
We will get-go by taking a quick look at the theory backside JWT and how information technology works. Then we will look at how to implement it in a Leap Boot application.
JWT Basics
JWT, or JSON Web Tokens (RFC 7519), is a standard that is more often than not used for securing REST APIs. Despite beingness a relatively new technology, it is gaining rapid popularity.
In the JWT auth process, the front stop (customer) firstly sends some credentials to authenticate itself (username and password in our case, since we're working on a spider web application).
The server (the Spring app in our example) then checks those credentials, and if they are valid, information technology generates a JWT and returns information technology.
Subsequently this step customer has to provide this token in the asking's Authorisation header in the "Bearer TOKEN" form. The back finish will check the validity of this token and qualify or pass up requests. The token may too shop user roles and qualify the requests based on the given regime.

Implementation
At present let's run into how we can implement the JWT login and save machinery in a existent Spring application.
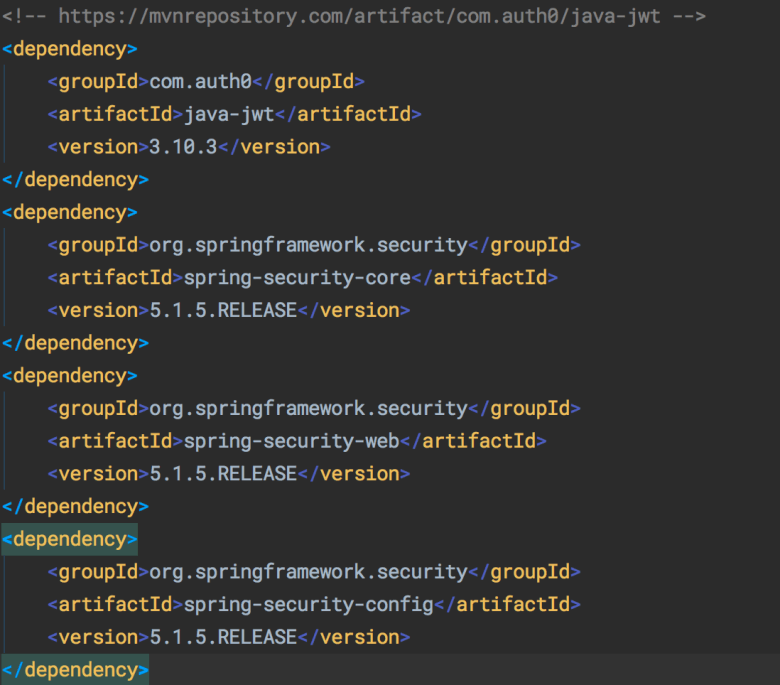
Dependencies
You can meet the list of Maven dependencies that our example lawmaking uses below. Notation that the cadre dependencies like Jump Boot and Hibernate are not included in this screenshot.
Saving Users
We will showtime by creating controllers to save users deeply and cosign them based on username and password.
We have a model entity called User. It is a elementary entity class that maps to the USER table. You lot can apply whatever properties you demand depending on your awarding.

Nosotros also have a simple UserRepository class to save users. We need to override the findByUsername method since we volition utilise it in authentication.
public interface UserRepository extends JpaRepository<User, String>{ User findByUsername(String username); } We should never shop plaintext passwords in the database because many users tend to use the same password for multiple sites.
In that location are many different hashing algorithms, but the near commonly used one is BCrypt and information technology is a recommended method of secure hashing. Yous can cheque out this commodity for more information on the topic.
To hash the password, we will define a BCrypt edible bean in @SpringBootApplication and comment the main class equally follows:
@Edible bean public BCryptPasswordEncoder bCryptPasswordEncoder() { render new BCryptPasswordEncoder(); } We will telephone call the methods on this bean when nosotros need to hash a password.
We besides demand a UserController to save users. We create the controller, annotate information technology with @RestController, and define the corresponding mapping.
In our awarding, we save the user based on a DTO object that is passed from the front. You can as well pass a User object in @RequestBody.
After we pass the DTO object, nosotros encrypt the password field using the BCrypt bean we created earlier. You could also do this in the controller, just it is a improve do to put this logic in the service form.
@Transactional(rollbackFor = Exception.class) public String saveDto(UserDto userDto) { userDto.setPassword(bCryptPasswordEncoder .encode(userDto.getPassword())); return save(new User(userDto)).getId(); } Authentication Filter
We demand authentication to make sure that the user is really who they merits to be. We will exist using the classic username/password pair to reach this.
Here are the steps to implement authentication:
- Create our Authentication Filter that extends UsernamePasswordAuthenticationFilter
- Create a security configuration class that extends WebSecurityConfigurerAdapter and utilize the filter
Here is the code for our Authentication Filter – as you might know, filters are the backbone of Bound Security.
Let's get over this code pace by step.
This class extends UsernamePasswordAuthenticationFilter which is the default class for password authentication in Spring Security. Nosotros extend it to define our custom authentication logic.
We make a phone call to the setFilterProcessesUrl method in our constructor. This method sets the default login URL to the provided parameter.
If you lot remove this line, Spring Security creates the "/login" endpoint past default. It defines the login endpoint for us, which is why we will not define a login endpoint in our controller explicitly.
Afterwards this line our login endpoint will be /api/services/controller/user/login. You tin use this office to stay consequent with your endpoints.
Nosotros override the attemptAuthentication and successfulAuthentication methods of the UsernameAuthenticationFilter class.
The attemptAuthentication function runs when the user tries to log in to our application. It reads the credentials, creates a user POJO from them, then checks the credentials to cosign.
Nosotros pass the username, countersign, and an empty list. The empty list represents the authorities (roles), and we leave information technology as is since we do not have any roles in our application yet.
If the authentication is successful, the successfulAuthentication method runs. The parameters of this method are passed by Spring Security behind the scenes.
The attemptAuthentication method returns an Authentication object that contains the government we passed while attempting.
We desire to return a token to user after authentication is successful, so nosotros create the token using username, secret, and expiration date. We need to define the SECRET and EXPIRATION_DATE now.
We create a class to exist a container for our constants. Y'all can set the underground to whatever you want, simply the best practice is making the secret key every bit long as your hash. We use the HS256 algorithm in this example, so our surreptitious key is 256 $.25/32 chars.
The expiration time is prepare to 15 minutes, because information technology is the best practice confronting secret central brute-forcing attacks. The time is in milliseconds.
We have prepared our Authentication filter, but it is not active notwithstanding. We also need an Authorization filter, and so we will apply them both through a configuration course.
This filter volition check the being and validity of the access token on the Dominance header. We will specify which endpoints will exist subject to this filter in our configuration grade.
Potency Filter
The doFilterInternal method intercepts the requests then checks the Authorization header. If the header is not nowadays or doesn't start with "BEARER", information technology gain to the filter chain.
If the header is nowadays, the getAuthentication method is invoked. getAuthentication verifies the JWT, and if the token is valid, it returns an access token which Spring will use internally.
This new token is and then saved to SecurityContext. You tin also pass in Authorities to this token if y'all need for role-based authorization.
Our filters are gear up, and now we demand to put them into activity with the help of a configuration class.
Configuration
We annotate this class with @EnableWebSecurity and extend WebSecurityConfigureAdapter to implement our custom security logic.
We autowire the BCrypt bean that we defined earlier. We besides autowire the UserDetailsService to find the user'southward business relationship.
The about important method is the one which accepts an HttpSecurity object. Here we specify the secure endpoints and filters that nosotros want to apply. Nosotros configure CORS, and so we permit all post requests to our sign upwardly URL that we defined in the constants class.
You can add other ant matchers to filter based on URL patterns and roles, and you tin can bank check this StackOverflow question for examples regarding that. The other method configures the AuthenticationManager to use our encoder object as its password encoder while checking the credentials.
Testing
Allow's transport a few requests to exam if it works properly.
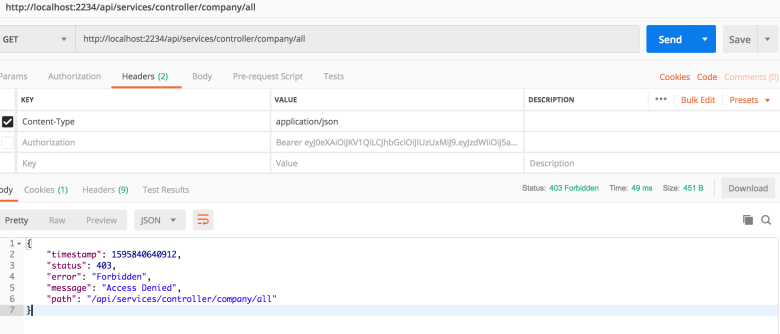
Hither we transport a Go request to access a protected resource. Our server responds with a 403 code. This is the expected beliefs because we haven't provided a token in the header. Now permit's create a user:
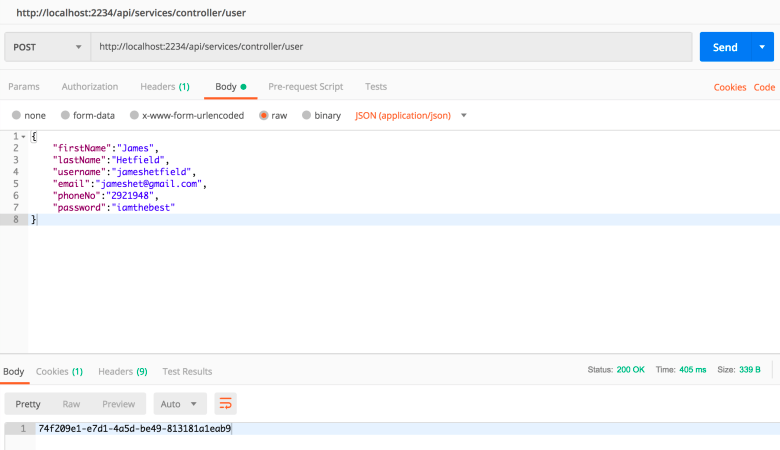
To create a user, nosotros send a post request with our User DTO data. We will use this user to login and become an access token.
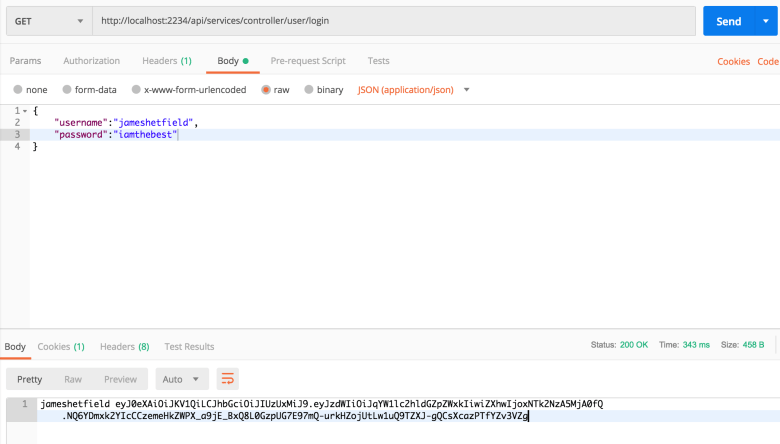
Great! We got the token. Later on this point, we will use this token to admission protected resources.
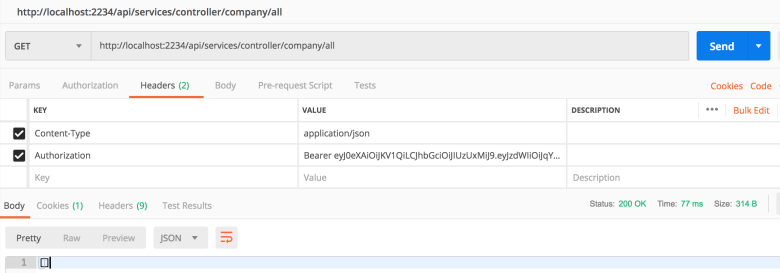
We provide the token in the Potency header and nosotros are now allowed admission to our protected endpoint.
Conclusion
In this tutorial I accept walked you lot through the steps I took when implementing JWT authorization and countersign authentication in Jump. We too learned how to save a user securely.
Cheers for reading – I promise it was helpful to you. If you are interested in reading more content like this, experience free to subscribe to my web log at https://erinc.io. :)
Learn to code for gratuitous. freeCodeCamp's open source curriculum has helped more than 40,000 people get jobs as developers. Go started
Jwt Basic Authentication Login Example Java Spring Boot
DOWNLOAD HERE
Source: https://www.freecodecamp.org/news/how-to-setup-jwt-authorization-and-authentication-in-spring/
Posted by: 10newsonlinepoi.blogspot.com
comment 0 comments
more_vert